TUESDAY, DECEMBER 16, 2008

OK, before you get all over me about being in the "real" world, just give me a minute to explain ;-)

I bought a set of plans for the Joli boat from Philip Thiel. Unfortunately, this is not the right "season" in my life to really start building a boat. So, should I just wait and dream, or should I make some kind of forward progress?

My intent here is to keep a journal of my progress. I'll be using Google Sketchup to build my virtual boat. I'm sure that along the way I'll run across problems that need solving, trouble keeping on task, and moments of inspiration.

I'll include pictures and video as I progress. Click on any picture if you'd like to see it larger.

Maybe I'm crazy, but follow along and see what you think
Showing posts with label Sketchup. Show all posts

Wednesday, May 13, 2009

It’s Too Long!

I was just sure I had settled on a floor plan that would work well for our family. The truth is, “not exactly”.

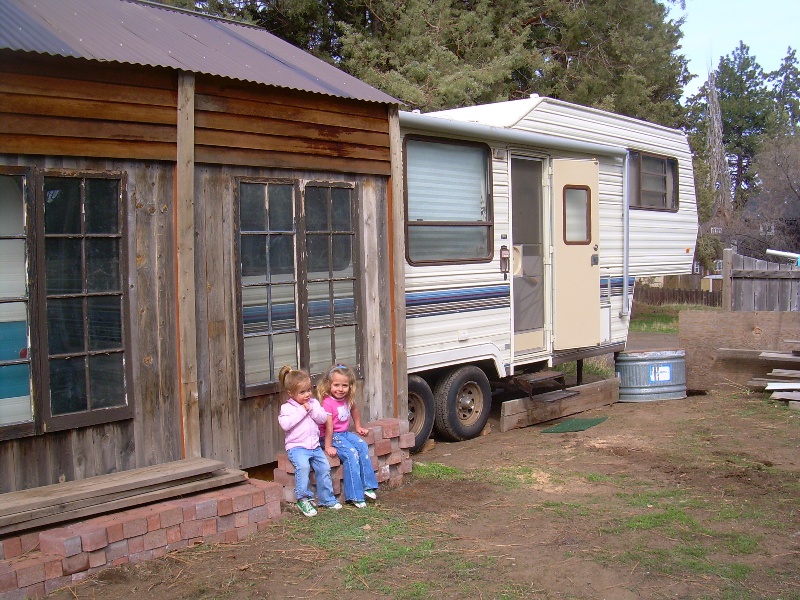
Things looked good on my virtual paper and some of the 3d stuff looked pretty good also, but I had a good wakeup call when we moved a friend’s 27’ fifth wheel trailer into the back yard for my daughter and her kids to live in.

Wow, this thing is big!


I hadn’t really spent much time thinking about storing my Joli and if I were really honest with myself, I think I’d need to admit that my boat will spend the majority of the time on a trailer.


So, the search started on the internet. I wanted to find some pictures of designs that I liked that were around 27’ long. I wanted to see pictures of boats in the water as well as on the trailer.


I found pictures of Bolger’s 29’ Tennessee. It’s a design I really like and I think it looks pretty good on the water. (Update  11/23/09! A reader pointed out that I had mislabeled this boat. It is actually Mark Van Abbema's 40' Mark V 39. 
Sorry for the error. Read more about it Here. 


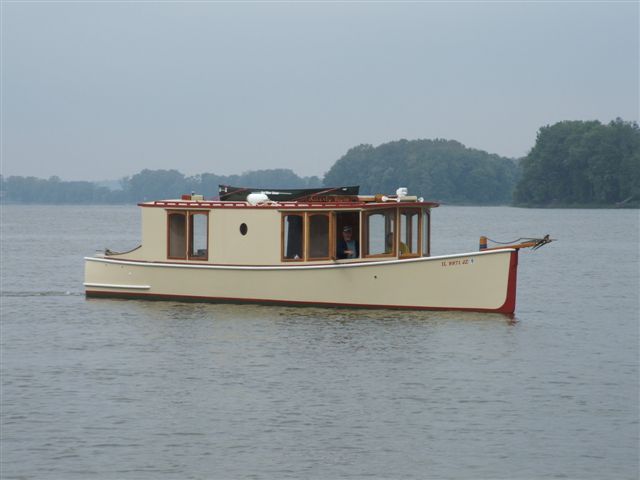
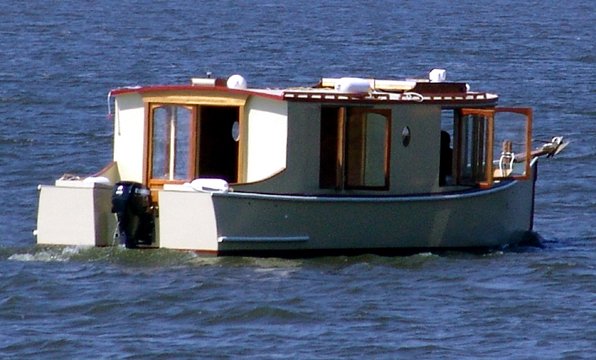
But look what happens when you pull this boat out of the water.


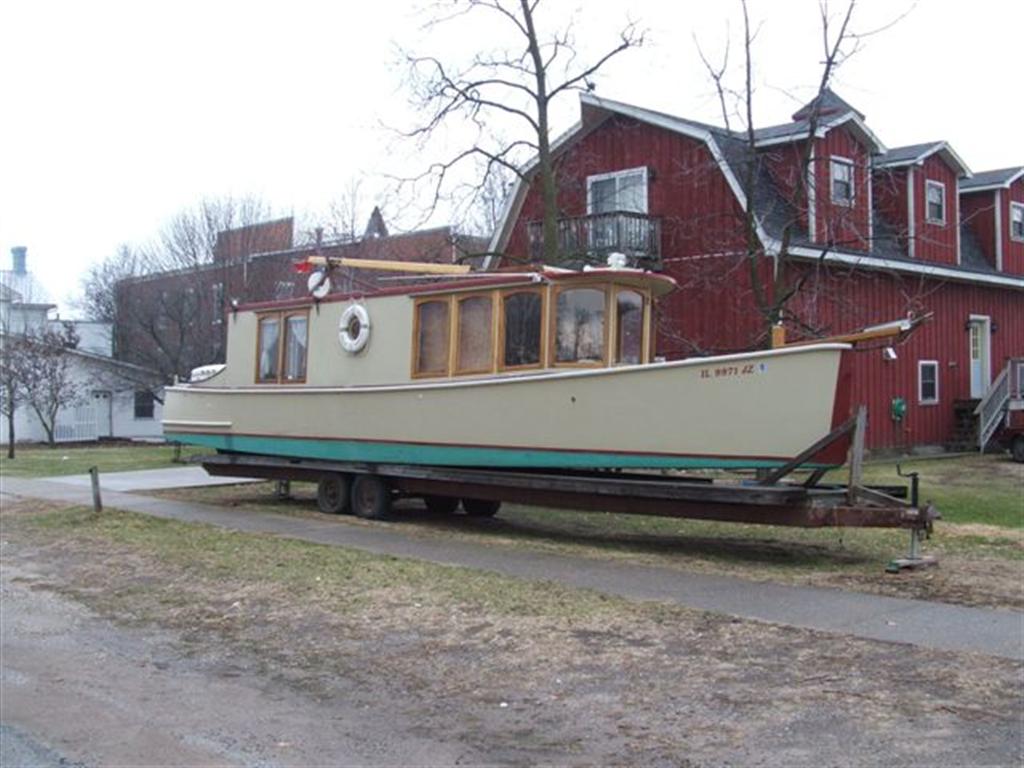
I don’t have room to keep something like this and in fact I’m not sure it would make it up the driveway into our back yard. I need to consider the length behind the trailer axles as well as the length of the tongue. These things will really impact the places this boat could be towed.


I’m disappointed with this reality check. I had great visions of sharing extended weekend trips on the Joli with another couple or with our kids and grandkids. The combination of a rear double bunk and forward single bunks along with a dinette that makes into a bunk would really let us spread out. The truth is, we just won’t have that luxury.
I’ve re-drawn the floor plan, again! Things haven’t changed a whole bunch except for the elimination of the rear double bunk and making the head/shower shorter.


The rear cockpit is shorter now and more like a canal boat from Europe. The forward cockpit is longer and should provide a nice place to get outside.
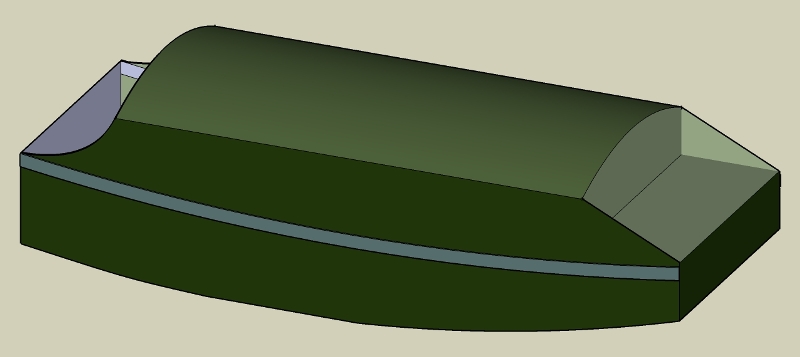
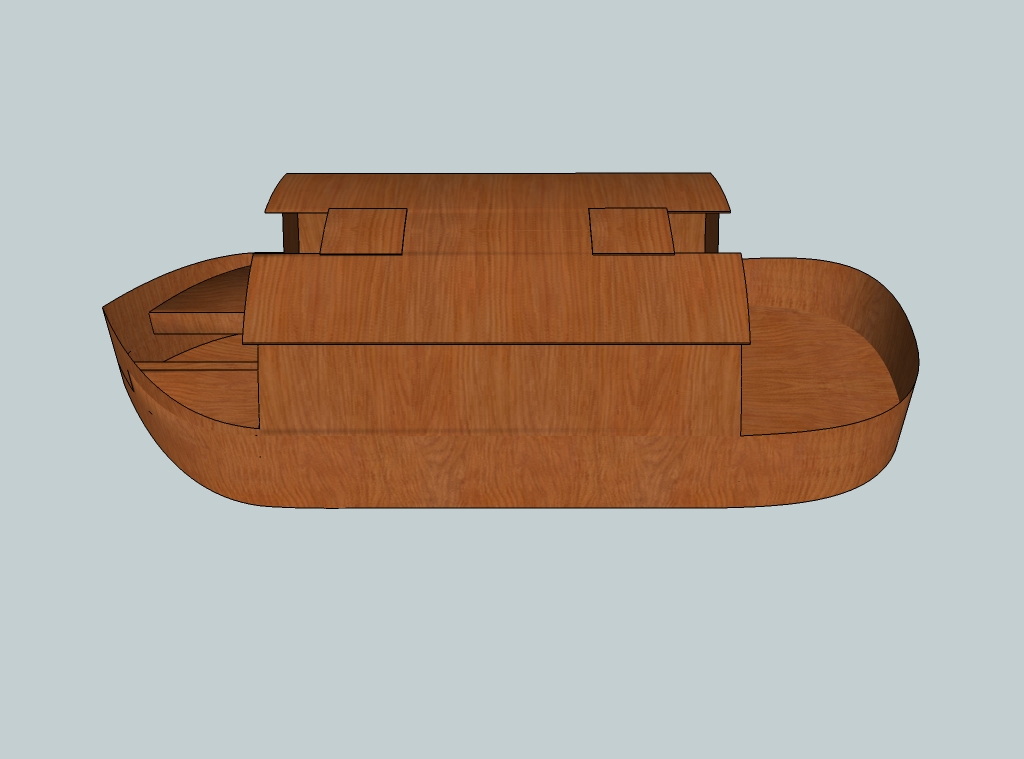
I’ve been working in Delftship to see if I can learn how to draw hull shapes beyond the limits of Sketchup but I’ve also learned some new Sketchup techniques that apply to drawing boats.

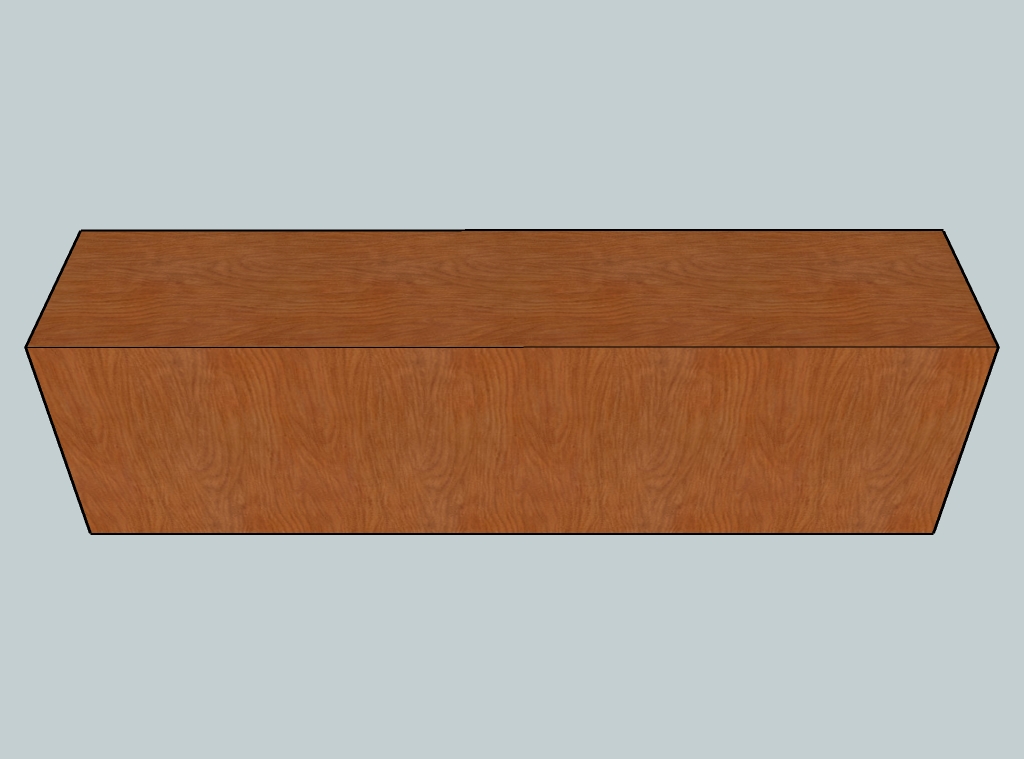
I want to see how my Joli shape is developing beyond the flat floor plan I’ve been working with. Here are the steps that I used to move into 3D using Google Sketchup.
This is done much like you would if you were carving a boat out of a solid block of wood. In my case, I’ll be carving a half model.
I started by using the rectangle tool to draw a rectangle that is the overall length of my floor plan by ½ the width, (23’ 7” x 4’).


I then used the push/pull tool to turn my rectangle into a block by pulling up the face to the overall height of my Joli, (82”).


Now it’s time to do a little drawing on the faces of the block. I started with a view of the top and used my floor plan to draw an outline of my Joli. Next, I used Philip’s original plans to get an idea of the amount of rocker on the bottom of the boat. I used the Bezier tool to draw this arc on the side of the block.


Now for a few tricks. I had to copy the shapes that I drew on the side of the block. I pulled these away from the surface and will use them later. The original lines on the side of the block need to be deleted. Now I can use the push tool from the top to remove the “wood” from my block that is outside of my lines. Use the eraser tool in conjunction with the ctrl key to smooth the curves and remove the vertical lines by clicking on them.


The next step was to pull the face of my rocker shapes through the block. Now another important trick. I selected the block as well as my rocker shapes and used the intersect tool to tie them together. Next, I deleted the lines and faces that would remove the “wood” from my block that is outside of my lines.


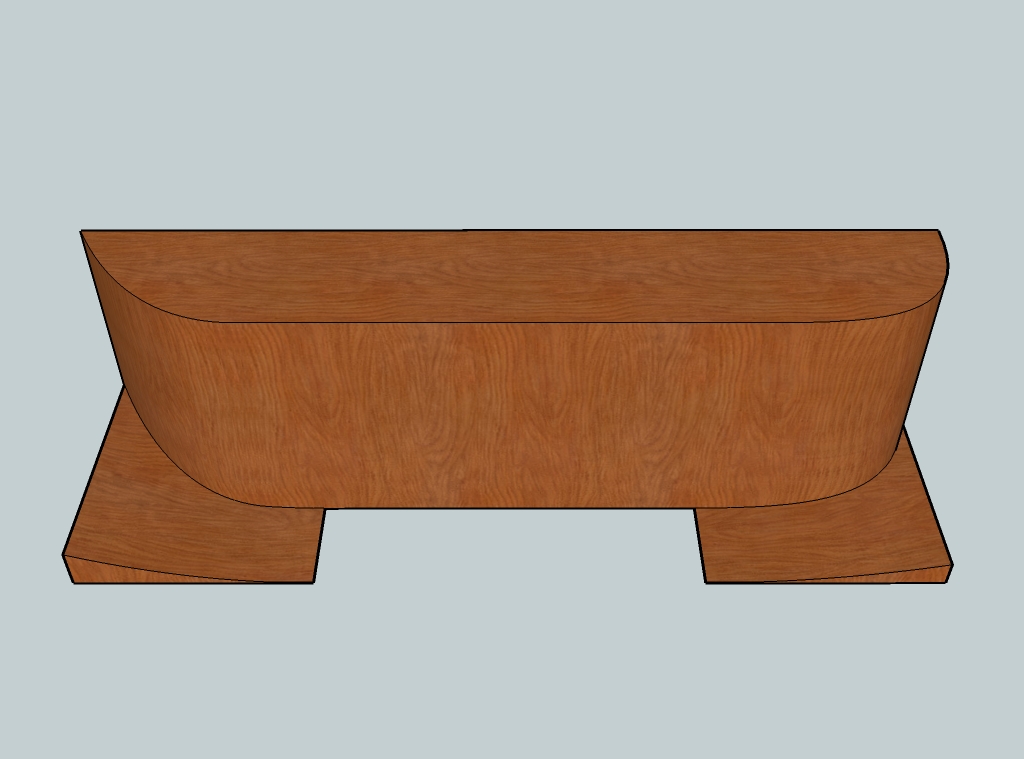
Here’s a picture and a short video showing the curved hull shape. There are some things that didn’t draw out correctly in Sketchup but it does give me a good idea of how some of my “enhancements” will look. The current drawing doesn’t show the outboard motor and cover yet. I’ll continue to work in Sketchup as well as Delftship to further develop my ideas.


I had a nice chat with Bryan Lowe tonight on Facebook. It was good to touch base with him again. Look for an update on his blog soon. It looks like I will be able to get together with Bryan for the Homebuilt Wooden Boat Show in Seattle during the last weekend in July. I’ll take a couple of extra days off so we can spend some time cruising the Snohomish river in his Escargot.

Wednesday, February 18, 2009

The Joli Wee Spark

I’ve worked a little with the floor plan of the Joli to see if I could make it look a little more like a nautical boat. I’m using the basic hull shape from the Wee Spark that I introduced to you during our last visit. 

I tried to work within the confines of my revised frame locations based on my extended length version of the Joli. I left the original width on as many frames as possible and only the ones on the end get modified.

It looks like the rounded transom will work fine as it still hides the outboard motor. The rear bunks get narrower right towards the foot end, but that should be fine.

The bunks in the front are more severely affected by this hull shape change. The forward bunks are now a modified V berth. I did lose some overall width but I think they’re still within reason. It looks like they will tuck under the front ladder. 

Larger Video

I may be exceeding the abilities of Sketchup with this modified shape so I’ve downloaded the newest free version of DELFTship and may try again to learn this software. It really is a better tool for boat designing. We’ll see. Here’s a version of the Clyde Puffer done with DELFTship. The Puffer is the original ship that the Wee Spark is based on.

Here’s another example of what is possible in DELFTship.

I haven’t given up on Sketchup yet. Look at how complex this hull shape is. I guess I need a little more practice ;-)

Now let me complicate the options a little further. There is also a program called FREE!ship. This software is produced by the original developer of DELFTship, Martijn Van Engeland. There is a nice tutorial at the Wooden Boat Forum if you’re interested in pursuing this further. Here is another tutorial for FREE!ship.

It also seems that models built in DELFTship or FREE!ship can be exported and used in Sketchup. See an example here

Wow, so much to learn!

Thursday, December 25, 2008

Where am I Headed?

This seems like a good time to talk a little bit about my thoughts on my Joli boat build.

I know I’m treading on thin ice here as I’m thinking about changing an existing design and making “improvements”.

Yea right, what do I know about boat design? I guess that is another reason to build my Joli boat virtually first. Of course I won’t know the impact of these changes until I have a real boat in the water but at least I can explore some ideas and resolve some issues that come up before I’ve invested a bunch of time, effort, wood, and epoxy.

I’m looking forward to doing some more designing using the free Google Sketchup. This program will have some limitations when it comes to drawing boats, and in fact there are better hull design programs available, but I’m going to stick with Sketchup for now.


If you’re interested in boat design, you may want to check out DELFTship. Bruce Hallman of the Bolger Yahoo group is using this software to draw amazing isometrics of many of the Bolger designs. You can see his work over on Flickr. There is a free version of this software available.

The first thing that I want to try to modify is the cabin shape of the Joli. I’m wondering if curving the sides of the cabin in towards the top would give it a little more nautical shape or look. This would also give the roof a slight overhang that I think might look good. I realize that this will create some problems with building the boat upside down using Philip’s method of leaving the frames long to act as temporary supports. I’ll have to work on a solution for this.


I’m also thinking about building the frames more like a traditional raised panel wood door. I think I could use clear cedar deck material as the frames along with paneled inserts made out of pine bead-board. I think this would give a nice contrasting color below decks as well as a warm cabin feeling.


I’ve also collected photos from the web about different ways to finish the interior. I really like the look of flush fitting doors & drawers finished in a oil-based enamel paint. I don't think knobs are a good idea and I think there has to be some way to keep the doors and drawers closed while under way. I think I would finish the ceiling with the same pine bead-board as the frames, but I would paint this with a white oil-based enamel to keep it light down in the cabin.


I would like to use clear cedar deck boards on the floor of the cabin using the frames as the support much like a deck would be built in your back yard.


Well there really is so much more to dream and plan about but I better start thinking about where I might build a boat like this. I’ve got a carport out front that might work, and I’ve got some room in the backyard that might work. Our lot is 50’ x 100’ so this will take some creativity.

Stay tuned!